Your Guide To Creating New Columns in Power Apps13 min read

Your Guide to Creating New Columns in Power Apps
Welcome to this, the second in a series detailing your most-asked questions about Microsoft Dynamics 365, Power Platform and Dataverse! In our first blog post, we described the changing face of Modern Advanced Find; now, Cloud9's experts Dan, Jim and Yolandi are on hand to help you create new columns in Power Apps.
Step #1:
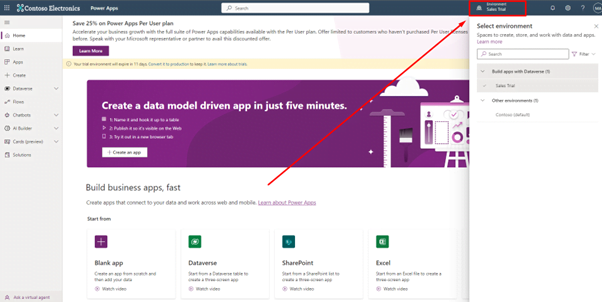
To begin, head to https://make.powerapps.com/ and choose the correct non-production environment (it's usually 'Dev' or similar).
Usually, you will do this in a sandbox-type environment; these are often called Dev, Development or Build. We recommend never doing this directly in your live production environment or your testing environment!
Step #2:
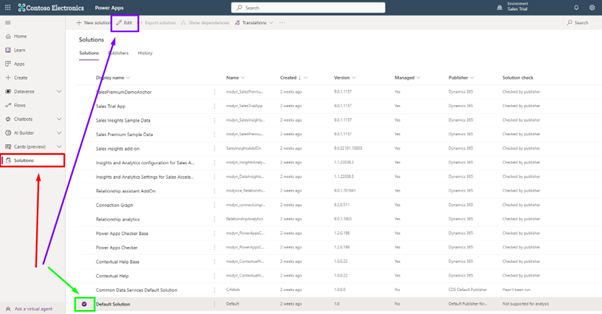
Next, click Solutions, find the correct unmanaged solution, and tick it or create a new Solution that will hold your changes. Then, click Edit.
Step #3:
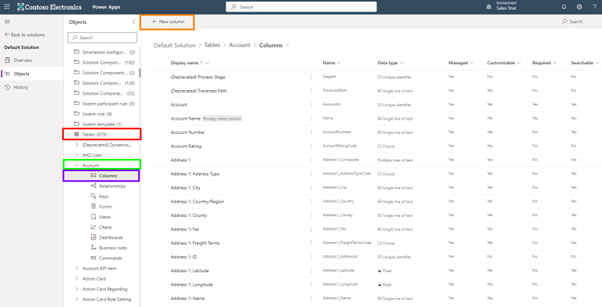
Select the Tables dropdown and search for the correct Table dropdown (in this example, Account Table is selected). If the Table you are adding the new field to is not in this Solution, with Tables selected, click Add Existing from the top ribbon, and choose Table. Then, navigate/search for the Table that will contain the new field.
Note: when adding a Table to your Solution we recommend you do not add any metadata or table elements other than the items you are changing. You can see more information about this in our Application Lifecycle Management blog – coming soon!
Once you have the chosen Table, you can select Add, then go to Columns, and then select New Column.
Step #4:
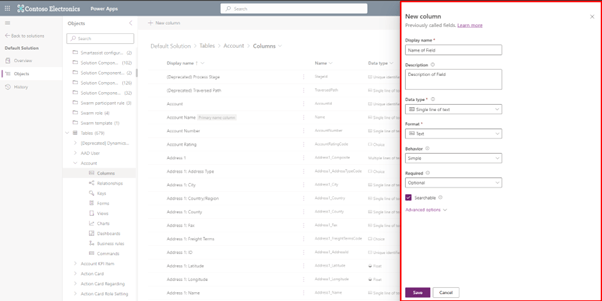
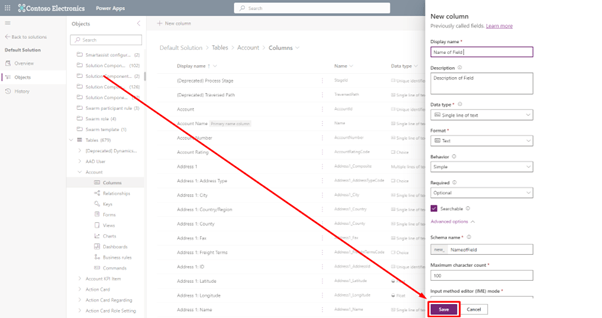
From here, a window will pop up on the right side of the screen. It's in this pane that we can define the field.
From here we can select the Name of the Field, Description, Field Type, Format, Behaviour and more.
Display Name
- This is the name by which the field will be seen by users either in filters or on screen, consider short plain language and avoid using a name similar to another field that might confuse users. After a record is created, you can amend the Display Name but... we recommend getting it right the first time!
Description
- This important setting helps others quickly understand the purpose of the field, note the text you enter will display on the screen when a user hovers the mouse over the field name as a tooltip, the text you enter needs to be front-end friendly and help the user understand what information could or should go into the field.
Data Type field
Note: Once set, this cannot be changed.
Text – String Inputs that can hold some formatting (e.g. A Name Column)
- Plain text – a single line of text, min 1 character and up to 4000 characters but 100 is the standard, changing the character length is possible after saving
- Text area –a multi-line text field where if you set more than one row on the screen, the text will fall into a new line, like a paragraph. Also, min 1 character and up to 4000 characters but 100 is the standard
- Rich Text – this allows rich text formatting in the field, in the same way, Outlook email text can be formatted. Use with caution, as it is difficult to export!
- Email – this formats and validates the text entered in an email format, it also presents an email icon next to the field that can be used to quickly create an email via your defaulted email tool in the user’s machine
- Phone number – formats like a phone number, allow the + prefix to be used, and also adds a quick-dial button if the system has a calling package connected
- Ticker symbol – formats in line with common ticker share price displays, more common in the US than elsewhere
- URL – formats as a web address and adds a click out to the field that will pop open a browser with the web address set
Number – Number inputs e.g. Number of Children Field)
- Whole number – no decimal allowed
- Decimal – decimal allowed, and the number of places can be amended, even after creating
- Float – usually used for latitude and longitude fields, you can set a min and max and the decimals places
- Language Code – displays the language code used on this form as specified by the Languages set in the system.
- Duration – records the number entered in whole number minutes, but on the selection the user can type “30 minutes” or 3.5 hours”, if you enter 3.5 hrs it records in the system as 210 (minutes). This field will display as the upper denominator e.g. if you enter 210 if will display as 3.5 hours. Consider using a whole number field if you always want to display the minutes only
- Time Zone – displays a selectable list of all time zones
Date and Time – Pick a date from a calendar (e.g. A Birthday) or a Date and Time (e.g. for a meeting), once created you can swap between the two.
- Date and Time – a user always has to set the time as well
- Date only – date on its own can be selected
- Other Notes:
- You can set fields to be either related to the current user’s local time or independent
- User Local – if Fred in London sets the field as 5 pm, Jenny in New York will see the field as soon as the field is translated to the user’s local time
- Time Zone Independent – the time entered is seen the same anywhere in the world by any user irrespective of their local time settings
- You can set fields to be either related to the current user’s local time or independent
Lookup – Search from records in another Table(e.g. Primary Contact of an Account)
- Lookup – this field creates a relationship between this table and another, it connects this record with a record in the other table
- Customer – this is a special lookup that can look up to both the account table and the contact table
Choice – “drop-down list” (e.g. Industry Type), we have three types:
- Choice – these allow you to display a drop-down from which a user selects only one of the choice options, great for segmenting and reporting, use where the drop-down options will not change regularly
- Choices – these allow a user to select more than one of the choice options, these can be used a little more like tags to mark multiple items against a record, like a set of products or personal interests for example
- Yes/No - these are super simple, but they can only be two options e.g. Black/Red
- Other Important notes on Choice fields
- If the choice options will change regularly, use a related table instead
- The choice options can be specified for this field, or can be Globally available e.g. they can be used in another Choice field, this means you only need to maintain one list
- Yes/No choices can work on a business process flow to only allow the process to move forward if a positive option is selected, Choice fields cannot. Yes/No choices can also use toggles or ticks on the screen to speed up data entry
- Choice type fields can have a colouring marker to alert users, sometimes if you want options of Yes and No to stand out, you can use a Choice rather than a Yes No and then colour the No option, so it stands out on the page
- In all these fields, if you change the label, the text if you like on the option, it changes for all other records that have that field set, so changes should be made carefully and consider using a related table if you expect the options to change
Currency – Number inputs with Currency (e.g. Revenue Field)
- When you create a currency field, if more than one currency has been set up in the system, three other fields also get created by the system, a Currency selector where you set which currency this field will be in e.g. GBP, USD, it will display the currencies that the Administrator has set up, it also creates a Base Currency field that is set to the base currency for your system, again this would have been set up by the Administrator. A third field is created showing the Exchange Rate last used on changes in this record. If you set the field as USD and the base currency in your system is GBP, the base currency field will hold the converted value in GBP. Note, the conversion only updates when the record is amended not when the currency rate changes.
Autonumber – Automatically created unique value fields that have some out-the-box possibilities (e.g. a Reference Number field)
- String prefix – allows you to type text or letters that the Autonumber will begin with, this helps users understand what the record is e.g. JOB-xxxxx or PROJECT-xxxxx
- Date prefix – this fills the Autonumber with the current date, it presents the date in YYYY-MM-DD format so sorting of this field will quickly change the newest to oldest. This is especially useful when a user needs to quickly understand when a record was created like in time-sensitive records.
- Custom – allows a combination of randomly generated text, dates, and sequential numbers in an order you prefer
- Other notes:
- For String and Date prefixes, you have an additional setting for the minimum number of digits the Autonumber will have, when all numbers in the range are used up it will increment another digit (for Custom prefixes you set the number of digits in the string itself)
- For all types of Autonumber, you can set the Seed value, the starting number from which the first field will use e.g. you could set 1000 for a 4-digit number rather than the number starting at 0001, this is useful when a previous numbering system was in place elsewhere and your new records need to carry on that range
- Random sequence string in the Custom type option is really useful for time-specific records that create in volume, e.g. you want to know when the record was created but not have a long sequential suffix, a four-character random string like xxx- AFGR would allow up to 1.5 million records to be generated the same day but only have 4 characters showing in the suffix, Random Sequence Strings also hide the order in which they were created where a sequential number suffix would show the order in which they were created
- Autonumber fields are often hidden or read-only on the form as the data produced is often concatenated into say the record’s Name field
File – file attachment Column (e.g. Contract File or photo)
- File – allows the attachment of a file, clicking the file will download the doc to the local user
- Image Standard – this allows a picture format file to be added, it displays a thumbnail of the attached image
- Image Primary – same as a standard but also put a small thumbnail next to the name field top left of the screen, this is also visible in views, so it works brilliantly for company logos or people photos. Only one is possible per record
- Other Notes:
- File records store data in Dynamics file storage, which is expensive, they should be used sparingly
--
Behaviour setting
This determines further variables on the field, the default is usually “Simple”. Once set this cannot be changed after the create stage.
- Simple – Allows direct inputs made by the user or a data import
- Calculated – The field value is not directly inputted by a user, the value is calculated by the system based on other fields, it can calculate on dates, values or text.For example, you can contact a first and last name field or you can subtract/multiply/divide or add one numeric value to or from another. Calculated fields update when the record is opened, saved or one of the calculation fields is changed AND autosaved.
- Roll Up – This creates an aggregation of other related records using sum, min, max and counts just like in Excel, e.g. sum the number of phone calls made on this sales lead or the total value of invoices on this account.
Required setting
This guides a user as to whether something must be completed on a record, this can be changed after the field is created.
- Business Recommended – Blue Star denotation * - Recommended by the Business to fill in data
- Business Required – Red Star denotation * - Required by the System to be filled in before being Created or Saved
- Optional – No denotation - Optional to be filled in
Searchable setting
Want to know how to make a column searchable across Dynamics? This denotes whether the field can be in the Advanced Find search, think about whether it’s indexed in Google search or not, it also allows it to be selected when editing views. The default value is Yes
Advanced Options
- Schema Name – The name that the system sees - Automatically created based on the Display Name but can be edited before saving only, the Display Name can later be edited but not the Schema Name once it is set. No spaces or special characters are allowed
- Enable Column Security – Enable added security to control access to the field, it means this field in isolation can set who can read it, amend it or create data in it. Especially useful for sensitive data points such as private phone numbers or credit limits on accounts
- Enable Auditing – Enable Auditing on the field to track changes, which also allows the field to be an event trigger in Power Automate
- Input Method Editor (IME) mode – The default here is Auto. This controls whether a user can input text not easily represented on a QWERTY keyboard, commonly adding accents to letters or where East Asian languages have more characters than the keyboard has. The system recognises standard IME recognisable characters, you can also Disable this for this field to restrict the data that can be entered.
Step #5
Before you Save the field, review the whole settings one by one as most cannot be amended once the record is created. A common mistake is to create a field using the default values in a hurry, as many variables cannot be changed later you will have to delete the field and start again, if you have placed the field on Forms or in Views, you will have to undo that work before deleting and start again. Some time spent now checking is time saved later. only once you are happy that your new Field has been correctly defined, press Save.
While fields can be created in either the Classic or newer make. powerapps interfaces, we have shown today they make. powerapps experience, this is the preferred way to save fields as it also publishes them so they can be used in Form Designs and Views quickly.
Thanks to Principal Consultant Jim Alsop for guidance and advice on this topic. For more tech tips and Insight insider knowledge, don't forget to bookmark our blog today.
Want help wrangling Modern Advanced Find? Then head here.
Cloud9 Insight is on a mission to make Microsoft Dynamics 365 easier to use than ever before. Want it for your SMB? Get in touch today.
Share On Social Media
![]()
![]()
![]()
Join Our Mailing List
Get the latest Dynamics 365 news, blog updates, webinars events and invitations.