Welcome to this, the second in a series detailing your most-asked questions about Microsoft Dynamics 365, Power Platform and Dataverse! In our first blog post, we described the changing face of Modern Advanced Find; now, Cloud9’s experts Dan, Jim and Yolandi are on hand to help you create new columns in Power Apps.
To begin, head to https://make.powerapps.com/ and choose the correct non-production environment (it’s usually ‘Dev’ or similar).
Usually, you will do this in a sandbox-type environment; these are often called Dev, Development or Build. We recommend never doing this directly in your live production environment or your testing environment!

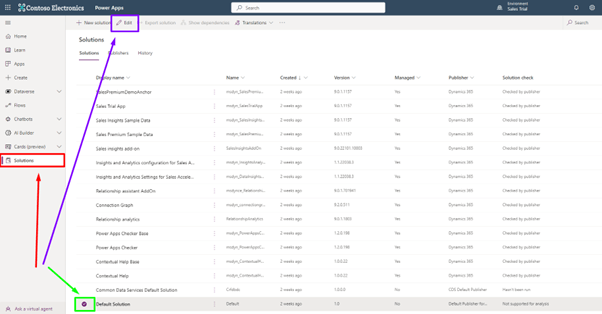
Next, click Solutions, find the correct unmanaged solution, and tick it or create a new Solution that will hold your changes. Then, click Edit.

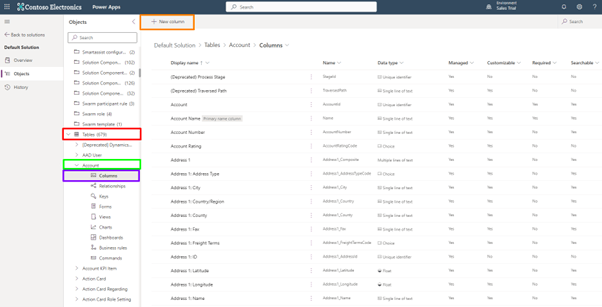
Select the Tables dropdown and search for the correct Table dropdown (in this example, Account Table is selected). If the Table you are adding the new field to is not in this Solution, with Tables selected, click Add Existing from the top ribbon, and choose Table. Then, navigate/search for the Table that will contain the new field.
Note: when adding a Table to your Solution we recommend you do not add any metadata or table elements other than the items you are changing. You can see more information about this in our Application Lifecycle Management blog – coming soon!
Once you have the chosen Table, you can select Add, then go to Columns, and then select New Column.

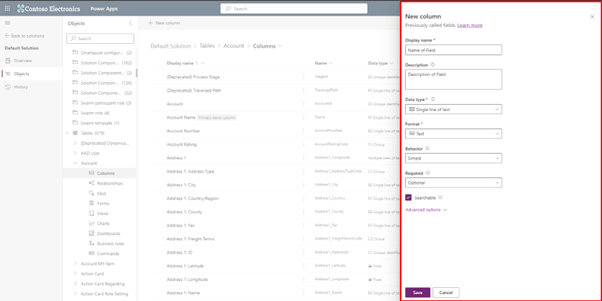
From here, a window will pop up on the right side of the screen. It’s in this pane that we can define the field.
From here we can select the Name of the Field, Description, Field Type, Format, Behaviour and more.

Note: Once set, this cannot be changed.
—
This determines further variables on the field, the default is usually “Simple”. Once set this cannot be changed after the create stage.
This guides a user as to whether something must be completed on a record, this can be changed after the field is created.
Want to know how to make a column searchable across Dynamics? This denotes whether the field can be in the Advanced Find search, think about whether it’s indexed in Google search or not, it also allows it to be selected when editing views. The default value is Yes
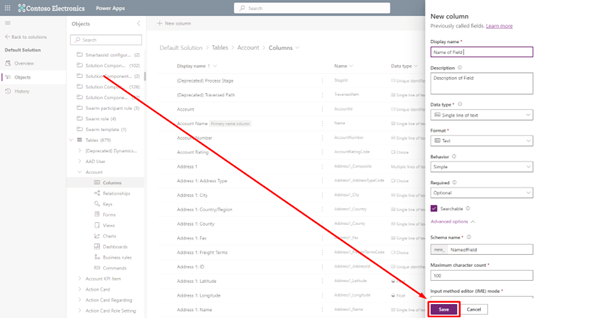
Before you Save the field, review the whole settings one by one as most cannot be amended once the record is created. A common mistake is to create a field using the default values in a hurry, as many variables cannot be changed later you will have to delete the field and start again, if you have placed the field on Forms or in Views, you will have to undo that work before deleting and start again. Some time spent now checking is time saved later. only once you are happy that your new Field has been correctly defined, press Save.
While fields can be created in either the Classic or newer make. powerapps interfaces, we have shown today they make. powerapps experience, this is the preferred way to save fields as it also publishes them so they can be used in Form Designs and Views quickly.

Thanks to Principal Consultant Jim Alsop for guidance and advice on this topic. For more tech tips and Insight insider knowledge, don’t forget to bookmark our blog today.
Want help wrangling Modern Advanced Find? Then head here.
Cloud9 Insight is on a mission to make Microsoft Dynamics 365 easier to use than ever before. Want it for your SMB? Get in touch today.